

Documentation
This page will be for showing how everything works. You can use the side bar to navigate through the page.
The location of the OPERAcraft folder should in the .minecraft/minecraft folder depending on your operating system (see the orange text on the install page). Inside you will see the tp_locations.txt, players.txt, roles.txt, and nicknames_colors.txt.
How it Works
For this mod to work correctly, the actors, cameras, projectors, and spectators must have the mod installed. This will enable everyone to see the mouth movement, arm movement, and other features. For setting up the following types of players, head down to the roles section.
actors
First, there are actors who play the parts within the production. For the original production, we had 5 actors. These actors are controlled by separate people on their own laptops/computers. They all connected to the projector's LAN world. These actors can move their arms into specific positions, and appear as talking through the use of microphones and a program called Pd-L2Ork. Each actor can have 6 arm states, and unlimited mouth states (provided you create x many mouth states). The arm movements correspond to how long the player holds the key. The longer the person hold the key, the slower the transition will be and vice versa, the shorter the key, the faster the transition to the next arm position.
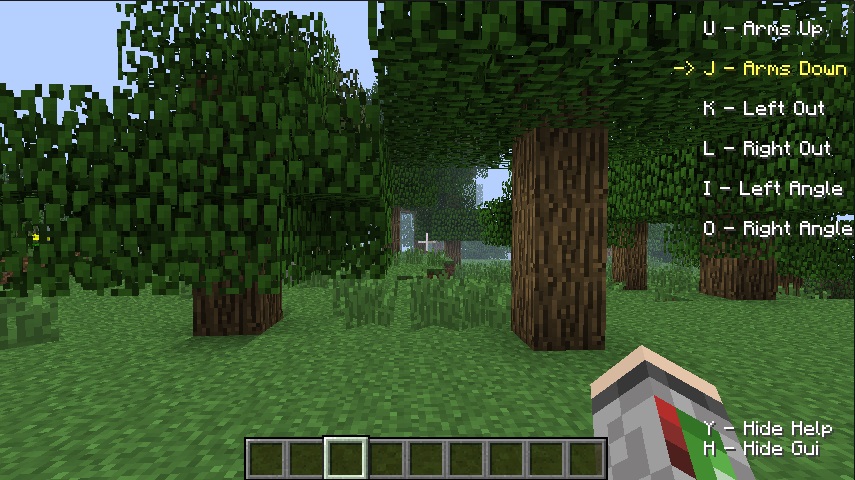
This is the view from the actor's screen. You can see which arm state is active and which is letters to press for each. Also you are able to hide the arm help GUI (Y) and also the bottom hotbar (H).
cameras
Second, there are cameras who watch the actors. There can be multiple cameras within the production, allowing for switching between different angles during scenes. The cameramen can all see each other, and so can all the actors. This helps with positioning for multiple angles. Even though the cameramen can see each other, the projector can not see any cameramen.
projector
Third, the projector is the lone computer who hosts the world map, and follows one camera at a time. A simple command to view a specific command is called to follow a certain camera. The projector takes over the view of the current camera's view, and "follows" the camera being watched.
spectators
Finally, the spectators are the people who connect into the game, and simply watch the production from whatever view they would like. Instead of watching the projector screen, the spectators can connect into the game and walk around anywhere. They are not visible, can not break any blocks, and are practically not there.
Teleportation
Using the following commands while in the game, you can edit the teleport locations, however, if you want to edit them manually you can open the tp_locations.txt within the OPERAcraft folder and follow this format:
0=username1=0=0=0=90=0
This will store location 0 for username1 at (0, 0, 0), facing West, and looking straight ahead. The commonly used yaw rotations are: 0 (South), 90 (West), 180 (North), and 270 (East). The commonly used pitch rotations are: -90 (looking straight down), 0 (looking straight ahead), and 90 (looking straight up).
tpall
The tpall command should be used as the following:
/tpall <number>
For example if you wanted everyone within the game to teleport to location 2 you would write:
/tpall 2
This command will teleport all characters that have a location 2 registered. The way you edit, retrieve, or clear the teleport locations is by using the other three commands provided.
While working on the production, you can issue:
/tpall here
to make everyone in the game teleport to your current location.
tpset
The tpset command requires two inputs along with the command argument.
The first argument is the location number. The second argument is the player's username. Whenever /tpset is called with an already existing location with the same player, it will overwrite the old one, replacing it with the new location. The tpset command stores the location with the player along with the x-coordinate, y-coordinate, z-coordinate, yaw (left and right rotation), and pitch (up and down rotation).
Let's say we are at position (0, 0, 0) and want to store this location as location 0 for username1.
To do this we issue the command:
/tpset 0 username1
Now the location 0 for username1 is (0, 0, 0) and username1 will face whatever direction the command sender was facing when the command was called.
tpget
The tpget command has three formats. The first format is that you specify the player you want to see locations for. To do so you would issue the command as:
/tpget username1
This would display on the in-game screen all of the coordinates along with the yaw and pitch, for each location stored, for specifically username1. The second format is to get all n locations. Let's say you want to get all of the player's that have a location 2. To do so, you issue the following command:
/tpget 2
This would display on the in-game screen all of the coordinates along with the yaw and pitch for all location 2 's. The third format requires you to specify the location number and the player name. Let's say we still are using the username1 as mentioned above. We had just run the tpset command again and now his coordinates for location 0 are (1, 1, 1). If we forgot what his/her location was we would issue the following command:
/tpget 0 username1
This would display on the in-game screen the coordinates along with yaw and pitch at location 0 for username1. If none were stored, a message will appear saying so.
tpclear
The tpclear command has four formats. The first is to clear all of the teleport locations. To do so you issue the following command:
/tpclear all
This would erase all the teleport locations. The second format is to clear all n locations. Let's say we want to remove all of the teleport locations at location 2, we would then issue the following command:
/tpclear 2
This would erase all the teleport locations at location 2. The third format is to clear all locations for a given player. If we want to erase all the locations for username2, we would then issue the following command:
/tpclear username2
This would erase all of username2's locations. The fourth format is to remove a specific location for a specific player. If we want to erase the location 2 for username2, we would then issue the following command:
/tpclear 2 username2
This would erase username2 's location number 2.
Loading
roles
To alter the roles of each player, you must edit the roles.txt within the OPERAcraft folder. There are four main roles which include actor, camera, projector, and spectator. When assigning the roles of actor, projector, or spectator you enter the following:
username1=actor
username2=projector
username3=spectator
This will make username1 an actor, username2 the projector, and username3 a spectator. To alter the cameras, you will need to specify a camera number along with the camera role. To do so, within the roles.txt add the following:
username1=camera=1
username2=camera=2
username3=camera=3
This will make username1 camera 1, username2 camera 2, and username3 camera 3. Notice that the camera values started at 1. The value 0 is reserved for when the projector can freely roam.
mouths
To alter the mouths of each player, you must edit two locations. First you must edit the players.txt within the OPERAcraft folder. The format is very specific. I will give an example, and explain what each part means. Say I put the following in the players.txt file:
player0=username1=4
player1=username2=3
The first argument of everyline must be playerN, starting with player0. If you have three actors that all need to be able to change mouths, then there should be three lines, with player0, player1, and player2 being the first argument for each line. The second argument is the player's username. It should be the username the player logs in to play Minecraft. The third and final argument is the number of mouths. In this case we say player0 has a 4 mouths and player3 has 3 mouths.
The second location we must edit is within the mouths folder inside of the OPERAcraft folder. Since player0 has 4 mouths (shown above), there has to be the following .png files within the OPERAcraft/mouths folder
player0Front0.png
player0Front1.png
player0Front2.png
player0Front3.png
player0Top.png
player0Bottom.png
player0Back.png
player0Left.png
player0Right.png
Notice that the index of the player0Front starts at 0, not 1. Once you have loaded all of these textures (typically 16x16 or 32x32), the player assigned to player0 will have all these head created. All of these .png files together will create 4 unique heads, with the top, bottom, back, left, right sides all being the same, but the 4 fronts being different. Again, the players.txt maps the username to the player0, player1, player2, etc. which will connect the player to the new head/mouth state.
To test the mouth's with the game type the following:
@mouth <username> <number>
To view username1's mouth number 3, type the following:
@mouth username1 3
The player with the username username1 should now have the head with the front textured from player0Front3.png
nicknames
If you would like to give the user a nickname, rather than just username1 or username2, you can edit the nicknames_color.txt within the OPERAcraft folder. To give a player a nickname, add the following to this text file:
username1=John
username2=Jane
This will make username1 have the nickname "John" and username2 have the nickname "Jane".
colors
If you want to change the color of the text of the characters (for subtitles) you can edit the nicknames_color.txt within the OPERAcraft folder. To change the color of username1 to blue, type the following into the colorName.txt:
username1=username1=blue
The reason we have username1 twice, is because we just want the player's name to be "username1". If we wanted to name username1 "John" and have his color be blue, we would type the following instead:
username1=John=blue
The legal colors you can enter are the following (no spaces for colors with two names such as dark green would be written as darkgreen):
- black
- darkblue
- darkgreen
- darkaqua
- darkred
- darkpurple
- gold
- gray
- darkgray
- blue
- green
- aqua
- red
- lightpurple
- yellow
- white
Pd-L2Ork
openport
This command is used to open the port through minecraft, in order for Pd-L2Ork to send in packets of information. There are two formats for this command. The first does not require any other parameters besides just the command name itself. By default, the openport command will open port 7000, if no number is specified. Let's say if we want the port to be 6000 instead of the default 7000, would run the command as the following:
/openport 6000
This will open port 6000, which Pd-L2Ork will need to connect to send packets of information (commands, subtitles, warnings). To open the default port (7000), run the following command:
/openport
This will open port 7000, which Pd-L2Ork will again need to connect to send packets.
showport
This command is used simply to see the port that is open. There are no parameters for this command, simply run the following to view the port opened:
/showport
This will show you what port is open.
Working with Pd-L2Ork
configuring
For Pd-L2Ork to be able to connect to the minecraft game, you will have to change and open the port to a specific value. To edit in Pd-L2Ork, press ctrl + e to enter and leave editing mode.
First, you must make sure everyone is on the same LAN, and all connected in the game. Second, in each of the .pd files, find the rectangle (near the bottom) that says "pd net_init". Double click this, and make sure that the last number in the box that says "connect $1 7000" is the port you opened. The only reason to change this number would be because you called /openport n with a number besides 7000. If so, change 7000 to n in each of the .pd files.
subtitles
To use subtitles, open up the subtitles.txt in your pdfiles folder and open MAIN_SUBTITLES.pd. To change what is output on to the screen, the format should be: "1, null This is a subtitle;" The number represents what order to print them out as, the word null is who said the subtitle, and the rest is the text to display.
If you want a specific person to say a subtitle, change null to that person's name. For example if we want Phil to say Hello World!, we would add this subtitle: "1, Phil Hello World!;". On screen this would appear as:"Phil: Hello World!" If you gave, for example, username1 a nickname and a color to go along with it within the nickname_colors.txt, make the name of the subtitle, the player's username. The subtitle will then be displayed as their nickname saying something, and also appear as their color
The MAIN_SUBTITLES.pd file is where you will choose which ones to send. You can click reset, next, or previous, or use the arrow keys to navigate through each line.

warnings
First, warnings are stage cues for each other actors. They will be sent only to the actors, and will not be shown on the projector. These can we used to help guide players on where to be, what to do, etc. To use these, it is the same as subtitles, except you no longer need to specify the name of the person such as null or Phil. For example if Phil needs to move across the room a warning could be: "1, @warn Phil move across the room in 5 seconds!;" This will display on every actors screen. You will need to edit the warnings.txt to change the what the warnings say. The numbering and navigation of the warnings is the same as the subtitles.

mapping
You will need to change the head states that correspond to the frequency of the person singing/talking. To do so open the MAIN_MOUTH_FADE_TELEPORT_DAYNIGHT_CAMERAS.pd file and edit....
teleporting
Teleporting is mostly used for changing the position of players before or after a scene takes place. For teleporting, all you have to do is type the number location you would like everyone to teleport to. This can be found with the MAIN_MOUTH_FADE_TELEPORT_DAYNIGHT_CAMERAS.pd file. The image for this GUI is at the bottom of this page.

Here we have the original teleport location at 0, click the box which makes the 0 red, then type the number 3, then we press enter. By pressing enter, the command that we learned about earlier, tpall, is being run with the value you input.
fading
Now we will need to change the fade value to send to the right character. The fade is used to enter or exit a scene. It will gradually make the screen go to black, for who ever it is called on. It will also do the reverse (fade in). Within the MAIN_MOUTH_FADE_TELEPORT_DAYNIGHT_CAMERAS.pd file, locate the rectangle with the words "send username5 @fade $1". If username5 is not the projector, enter editing mode (CTRL + e) and only change the player's name. Now whenever the large FADE button is pressed, that player's screen will go black or return to normal.

changing cameras
If you want to switch feeds from one camera to another, you can use the camera box found within the MAIN_MOUTH_FADE_TELEPORT_DAYNIGHT_CAMERAS.pd file. It works the same as the teleport box, except for now it will switch viewports for your projector. If you want the projector to be able to move freely, simply send the camera value 0, which will allow the projector roam wherever.
MAIN_MOUTH_FADE_TELEPORT_DAYNIGHT_CAMERAS.pd

Overview
The projector distributes the mod to everyone within the game which includes the actors, the cameras, itself, and anyone connecting from anywhere else.
Next, the projector must open the world and open to LAN. This will allow everyone to connect.
Next, everyone will connect to the game. Now that everyone is in the game, the production will be able to begin.
Now run the command /openport 7000 or just /openport. This will allow Pd-L2Ork to send packets of information.
Now that everything is configured, using Pd-L2Ork, you can send the subtitles, warnings, mouth movements, teleport locations, fade effects, and change the time of day. Here is a schematic detailing how it is layed out.
